
Cleaning and maintaining the reed valves on any air compressor will be vital to the longevity and integrity of the machine. But you don’t want to attempt cleaning them without understanding the best practices for cleaning, reinstalling, and overall maintenance.
How do you clean reed valves on an air compressor?
identified an issue being caused by a dirty reed valve, or you see that the valve has become blocked by debris, you will need to clean each part of the valve.
- Safely remove the valve.
- Open and disassemble the valve.
- Use solvent to clean all pieces.
- Use a small tool to get into the small holes
- Wipe down with a clean cloth
- Reassemble reed valve and attach back to the air compressor
Adhering to a proper maintenance schedule will increase your chances of having a high-functioning air compressor for years of operation. Consider implementing a reed valve and overall air compressor cleaning once per year and as needed in between. (cleaning on a schedule Should only be considered in commercial use with a higher than 60% duty cycle)
Why Cleaning the Reed Valve is So Important
Why Cleaning the Reed Valve is So Important
The valve is what keeps the air between the cylinder and the tank flowing smoothly and efficiently. If the valve begins to malfunction or has buildup debris or corrosion in it, the air compressor will not build pressure in the most efficient way.
Prolonged use of a compressor that has compromised reed valves can cause excessive wear to bearings, pistons, and other components.
Ensuring the integrity of the valve is maintained will enable the air compressor to work at its peak efficiency, Avoiding costly repairs.
Pro Tip: Preparation is key. Smaller compressors may have access to a single reed valve without taking the head off. Some larger higher pressure units will use valves. Most compressors have reed valves located under the head. Before starting, look up torque specifications and know what gaskets you will need. If the compressor is older than ten years, I recommend replacing the reed valves. Have everything ready to go when you decide to clean the valve. Since you will be removing, cleaning, and reinstalling small pieces, you don’t want this to be a spread-out, Have everything ready in a small clean area where you can get this completed quickly and efficiently.
How To Remove Reed Valves on common small air compressors.
Safety First:
- unplug or turn off the breaker to the compressor
- disconnect any hose to the compressed air system
- drain the tank
- lockout the power to the compressor (this makes sure no one turns the power on while your working on it)
- remove the air filter or intake port
- remove the tank supply line
- remove the head
- remove the valve plate
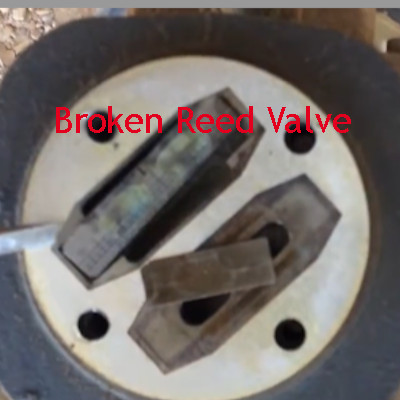
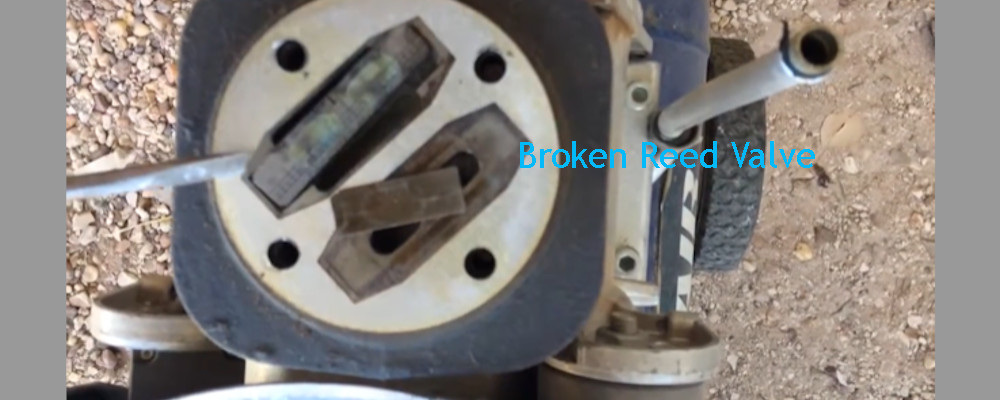
- clean and inspect the reed valves (if any cracks or chips appear in the valve, replace them)
- using a degreaser and a clean rag, wipe the valves, plate, and head clean. (If there are any imperfections in the plate or head, replace them.)
- clean all the surfaces
- using spay sealant, reinstall the valve plate and head on the compressor
- install and torque the head bolts
- install the tank supply line
- install intake and filter